23 November 2011

Oh, the shame ....

I am a bad person: I have not blogged for ages. I have no excuse other than life, and stuff happening. But just because I have not blogged, doesn't mean I've not been crafting. I've made some cards .... sadly no photos as they were were all snaffled straight away for various birthdays and get well soon postings. You'll have to trust me when I say they looked ok.

Now this digi page I've uploaded here is one of the pages I've done for the digi circle journal over on UKS. The theme for this one was childhood memories. I wasn't sure what to do for this as I didn't have any photos to illustrate the theme. Then I started thinking about what I spent most of my childhood doing - and the answer is probably reading. Which led me to remembering all the books I borrowed from the local libary to feed my hunger for words. And so my page idea was born.


Nature was the theme for another circle journal which seemed a perfect excuse to use one of the photos I took earlier this year of poppies growing in the fields near my home.


A similar CJ, called Nature's Glory, gave me the chance to use a different shor altogether, of the lovely holly growing in a local wood, dressed with snow.

Hope you like my creations ..... I shall try not to stay away from my blog for so long, next time!

30 July 2011

Butterfly card


I made this card in response to an on-line challenge. Can I remember who set the challenge, or where? No! Doh .... But never mind, I enjoyed making it. I do recall that there was a sketch to use and the idea of 'circles' as a prompt.

I used white card for the card base and stippled it with Tim Holtz Distress Ink. Cut a section of checked card and used my threading water border punch on one edge before mounting it. The three punched circles have had the edges inked and are mounted using sticky pads for dimension. The cardstock comes ready glittered, so there's a nice bit of built-in bling!

I have used a second ribbon-style strip of the checked card towards the bottom of the card, leaving a small amount of the white card below (you can't see this on my scanned version, sorry).

The small frame is cut using my Sissix die and Big Shot, and the added sentiment is a rub-on from my collection. Two pearl 'jewels' add the finishing touch to the frame.

25 July 2011

A digital creation

While I've been out of work, I've had much more time to explore the capabilities of my Photoshop Elements 8 software. I am, I admit, a little bit addicted to just playing around with it, mostly on photos, but also, it has to be said, with other elements that could be useful in digital, or in-the-flesh scrapbooking.

And here is my latest 'test' creation, which I was quite pleased with. I do have another, grungier version (postmarks are seldom crystal clear and perfect, are they?!) but I am not sure where I filed it (doh!). I don't think I've perfected the technique yet - I couldn't see to get the 'sent with love' text to appear the right way up, but hey, in my book,  any progress is good!
I made the image with the help of the fab people on elementsvillage.com. The site is well worth a visit if you want to got more from your Photoshop program, and everyone there is so helpful.


I've posted this link as one of my UK Scrapper companions has gone all postal, and when I read her blog, I thought my creation would be just perfect to share and add to the collection of all thing maily.

And here is a photo of one of our dogs Kalika, framed by moi, using masks and brushes. I did have fun doing this!

18 July 2011

Another week, another card ...


This is yet another of my photos which fails to do the card justice. It really does look better in real life, honest!

I made this in response to sketch challenge here:

 http://scrapology-adventuresinscrapb....blogspot.com/

The card base is simple white CS, and I've rounded the corners with a punch.I used some of my Papermania paper for the three-block background - the patterns and colours in the set are lovely, but because the paper is quite thin, I tend not to use it often. This seemed to be a great opportunity to put it to use.

Then I punched two scalloped circles, inked the edges and mounted them with sticky fixers to give dimension. The sentiment was created in Word and printed on a light card stock. Then I used a circle punch to cut out the required shape before mounting that on top. The white ribbon and thinner blue ribbon came from my ribbon stash drawer.

Thanks to everyone for looking, and for the lovely comments many of you are leaving for me - it's so encouraging.

16 July 2011

Saturday update

OK. Today's card features a sparkly butterfly cut using a lovely Marianne's Creatables die. It is cut from slightly holographic/sparkly cardstock which look better on the in-the-flesh version than in the photo.I've bent the wings upwards and mounted the body on a sticky fixer to give it dimension.

 The cardstock came from a Garden Party (DCWV) small stack and is handily already 'blinged' so I didn't have to add any further Stickles or gems. I wrapped a silver-edged organza ribbon  and bow around the DCWV card before sticking it onto the card base.

Simple, quick, and used up up just a little more of my stash!

11 July 2011

Just as I promised!

I promised to share some more photos of the cars I'd been making on my frugal creativity drive!

Not the best photo ever but I think you get the idea.

I've used a pink card base (I never used to like pink, so don't quite now what's happened these days, all my cards seem to be pink LOL) and my threading water punch to create the edging. I've done some inking with my Tim Holz Distress Ink pads, and used my Sizzix swirl to cut the flourish. The (Sizzix) scalloped / frame shape behind the flourish is cut from a textured wallpaper sample, and inked to bring out the relief. The button comes from my box of mum-donated stash. There's the compulsory low-level bling, too, in the form of gems and a bit of Stickles here and there on the flourish. The various elements are mounted with the help of sticky fixers to give a 3D effect.

Doesn't look bad in real life!!!!!

9 July 2011

Trying to be good

It is true, I have been trying to be good. Why? Well, I have been out of work now since December last year and redundancy payouts don't, sadly, last for ever. So I am trying to rein in my spending habits (not that they were ever very dubious - but who doesn't like buying the odd crafty thing here and there??!!).

The result from a crafting perspective is I've been making more of an effort to use up what I've got, scraps and all. The card above is just one of a batch I've made using what's stashed away in my office-cum-craft room. The exercise has also made me use my Sizzix dies and various punches, so I am feeling reasonably pleased with myself!

I will post up some more photos as I go along.

15 June 2011

Anyone for a dreadful pun?

You can see the card, so you can probably guess what's coming! Yes, it was something along the lines of 'Happy Baa-thday to ewe'. Sorry, but it had to be done!

I was asked to make a birthday card for a one-year old girlie at short notice, and not being very practised in the art of cards for infants, I ummed and ahhhed a bit trying to think what I could do. I've not managed to find my Cricut software or Design Studio software, much less get the codes I need to reactive the former on my my newly-rebuilt PC, so that avenue was a no-no.

I then remembered that a couple of years ago (or to my shame, maybe longer) I bought some Sizzix thin dies at a bargain offer price and hadn't yet got round to using them. With my Sizzix Big Shot I didn't really have any excuse not to try the sheep die, which I thought might be a suitable image for a wee lassie.

So I rummaged in my plain paper scraps box and found some suitable cardstock and away I went. I was quite chuffed at the results (the photo is a bit naff and doesn't do it justice, it looked smarter in the flesh!), especially with the rippled cardstock I found to use as the fleece.

The moral of the story is, I think, that you never know when the stuff you've bought is going to come in handy!

Happy crafting .......

8 May 2011

Getting messy at Paper Arts!


OK. So lovely Sue at Paper Arts near Stroud, rashly decided to have an open weekend at the shop - inviting us punters in to try the stash, get creative and get messy! Who could resist such an invitation? Even Sue (left) and Irene (right), who are usually to be found behind the counter, came out to play. I think they were having far too much fun ....

Elaine Rolfe (above. far right, ace scrapbooker and creative gal!) was on hand to give lessons in the art of flower making and loads of other stuff, too. You can see the flowers below - the photo doesn't really do the Ranger Ink / Tim Holz Distress Stains or Creative Impressions' Cosmic Shimmers! Incidentally, apparently you can wash Cosmic Shimmer stains out of clothes with a little help from good, old, Fairy Liquid ...

The flowers were amazingly simple - but very satisfying - to make, and are a great way of ensuring your embellishments match your layout or greetings card colour scheme. We used a small punch - possibly called Starburst? which Sue promises will soon be back in stock - for the centres, and a grungy flower-type die-cut for the petals.
 I've tried to show a sample flower (above) close up but a) my camera is not that brill, and b) it's raining and dark outside so I've had to try and take the shot in the poor indoor light. But I hope you get a bit of an idea.

These last flowers were made using the spiral flower template die from Marianne's Creatables. Available, of course, from Paper Arts LOL!

And here you can see a couple of my flower creations 'in situ' as it were, on two of the tags I made during the drop in sessions. Is it sad to admit I visited the shop on both Saturday and Sunday? I did ask permission, honestly.

I must say a very big THANK YOU to the lovely Elaine who so generously let me use some of her rubber stamps on these tags. And for her patience in helping us all with the new techniques and ideas. Thanks too, to Sue for sharing her tag and stain genius (you can see some samples in the shop if you happen to be in the area).

No, I didn't eat any of the cakes made by Sue's mum or partake in the nibbles provided but I have it on good authority that they were all very tasty. Judging by the size of the slices that were being consumed, calorie counting wasn't an issue this weekend!!!!!

And finally, well done to Sue for selling raffle tickets during the weekend for an Alzheimers charity. This is a cause close to my heart as one of my aunts has dementia and is in a care home. So sad to see a bright, smart, well-organised individual reduced to such a level by a cruel disease...

17 April 2011

Scrapped at last


At the very last minute, I signed up for a workshop at PaperArts near Stroud, yesterday. Sue made me most welcome, as always, and I joined Lorraine Freeman's class. You can see the result above.

I hadn't prepared any photos for the class as I really didn't know I was going for sure until Saturday morning, but discovered the Jenni Bowlin papers and Kraft card colours were perfect for scrapping this less-than-perfect photo of my lovely dad (sadly no longer with us).  I have had the photo for a long time but hadn't got round to doing anything with it. I'm glad to have had the opportunity to put that right.

I followed the class instructions pretty closely but omitted some of the lace and flowers to make the page less 'girly'. I also added some journalling to record how my dad loved to walk out in the orchard where he and mum used to live in Kent. Arthur, the cat, always went with him and they both, I think, rather liked the company! I decided that the page didn't need a title.

The stash details: Jenni Bowlin red large dot and vintage red tiny dot patterned papers. Kraft card. Brown card. Lace. Tim Holz Distress Ink. Cats Eye ink pads. Scallop punch. Flower punch. Small dot punch.


I finished this page at the workshop, too. Used various strips and ric rac for colour and texture. We went on this ferry for a trip to see the Needles close up. Which reminds me, the first layout also required some sewing, shock horror!

I did start on two other layouts during the day but didn't have all the materials I needed to finish them. I will complete them soon, I hope!

22 March 2011

Happy wedding anniversary!


Here's a card I made earlier this week for a 50th wedding anniversary. It's hard to see from the photos, but there's lots of texture here - in the hammered cardstock base, the lace strip and ruffle, the layered torn paper and the glittery bow. There's some embossed card, too, made with a Cuttlebug embossing folder, but used in my Sizzix Big Shot (I haven't got a bug).

The greeting is raised on foam pads, and the edges are inked for definition. It was supposed to be a red Tim Holz distress ink that I used, but there must have been some residue from another colour on the pad I used, and it came out coffee coloured. Fortunately, it went quite well, so I didn't worry too much.

I made the rose from some scrap 12x12 double sided paper I had in my odds-and-sods box. I scrunched the paper, sprayed it with glimmer mists and inked it, as well as distressing the edges ... I went the whole hog LOL! Oh, and I used one of the fab Woodware flower punches to make the petals. I am addicted to this flower-making mullarky!

There are some small stick-on gems, too, for a bit of bling. After all, why not!

Hope you like the result.

2 March 2011

What, March already?


OK. So I admit it - not only has 2011 arrived (how did that happen?) but it's already March and I've been a very Bad Blogger .... no pix or posts for ages! So I thought I ought to extract a digit, and join in for the first time this year in WOYWDW (What's on your work Desk Wednesday) or whatever the acronym is.

Anyway, I have loads of 'stuff' on my desk, as usual, and am far too embarrased to show you any evidence. So I've cleared a space and voila! here are my latest purchases from the lovely Sue at PaperArts http://www.paperarts.co.uk/  Sue has a bricks and mortar shop near Stroud and is well worth a visit, but if you are unlucky and don't live nearby, she'll be happy to take your orders online.

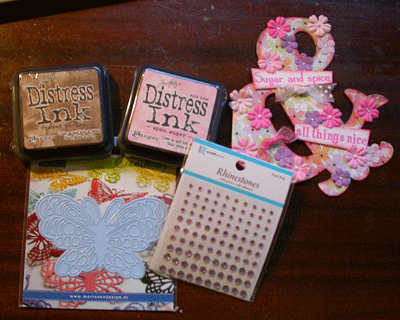
So, what did I buy? Well, I succumbed to a couple more Distress Ink pads for my collection (Spun Sugar and Frayed Burlap, if you're interested). Sue has them at great prices at the moment and there are lots of different colours in stock, so go and snag yourselves a bargain ...

I also bought some pale pink gems (Craftaroo) at just £1.20 for 100 rhinestones. I need them to add to the 'new baby' card I've added to the photo.

The fourth purchase was a Marianne's Creatables butterfly, which I've been debating about buying for a while. Today, I made up my mind and it, err, 'flew'  off the shelf into my hands. I am thinking about using this die (with my Sizzix Big Shot) to make a Mother's Day card. If I do, I will try and remember to share a photo of the finished item with you.

In case you're wondering, also on my desk but well out of shot, are Glimmer Mists, pen pots, double sided tape rolls, memory sticks, papers, card, ink pads, scissors, tooks, headphones, camera, embellishments, mobile phone holder, glasses, blossoms, a job description (I have a telephone interview tomorrow), rubber stamps, Promarkers, notepad, tissues, baking tray, gesso, rub-ons, ink, Dymo tapes, home-made paper flowers, ribbon, cord and a tube of mini Twiglets!!!!!

Now you know whay I am NOT showing you a photo of the whole thing!